> ## Documentation Index
> Fetch the complete documentation index at: https://docs.t3gemstone.org/llms.txt
> Use this file to discover all available pages before exploring further.
# Example Applications
> DX-APP Templates and Video Processing with DX-STREAM
DEEPX provides two separate reference projects so that applications using the accelerator module can be
developed quickly. **DX-APP** contains example application templates that can run on their own. **DX-STREAM**
makes it possible to build GStreamer-based real-time video processing pipelines.
In order to run the commands in this section, the driver and runtime installation must be completed. You can
verify the installation with the `dxrt-cli -s` command.
## DX-APP Example Applications
DX-APP contains ready-to-use C++ and Python templates for tasks such as object detection, classification,
pose estimation, segmentation, depth estimation and face recognition.
```bash theme={"system"}
git clone https://github.com/DEEPX-AI/dx_app.git
cd dx_app
```
Run the script that installs the build tools and the OpenCV library.
```bash theme={"system"}
./install.sh --all
```
The models and videos used in the example applications are downloaded with the `setup.sh` script.
```bash theme={"system"}
# The category and model selection is made through a menu
./setup.sh
# Only the specified models are downloaded
./setup.sh --models YoloV7 ResNet50
# All models available for download are listed
./setup.sh --list
```
The models are downloaded into the `assets/models` directory and the videos into `assets/videos`.
```bash theme={"system"}
./build.sh
```
As a result of the build, the executable files are created in the `bin` directory.
If you want to build only the application you need, you can specify a target in the form
`./build.sh --target yolov9s_sync`. You can list the available targets with the
`./build.sh --target list` command.
You can use the demo script to try all of the examples through a menu.
```bash theme={"system"}
./run_demo.sh
```
It is also possible to run a specific example directly.
```bash Python theme={"system"}
python3 src/python_example/object_detection/yolov7/yolov7_sync.py \
--model assets/models/yolov7_640x640.dxnn \
--image sample/img/sample_street.jpg
```
```bash C++ theme={"system"}
./bin/yolov7_sync \
-m assets/models/yolov7_640x640.dxnn \
-i sample/img/sample_street.jpg
```
### Common Command Line Options
All of the examples in DX-APP use the same command line options.
| Option | Description |
| ---------------- | ----------------------------------------------- |
| `-m`, `--model` | The path of the `.dxnn` model file to be run |
| `-i`, `--image` | The image file or directory to be used as input |
| `-v`, `--video` | The video file to be used as input |
| `-c`, `--camera` | The camera device number to be used as input |
| `-r`, `--rtsp` | The RTSP stream address to be used as input |
| `-l`, `--loop` | The inference repeat count |
| `--no-display` | Disables the visualization window |
| `--save` | Saves the resulting output to a file |
| `--show-log` | Produces detailed log output |
The `--image`, `--video`, `--camera` and `--rtsp` options are alternatives to each other and only one of them
can be used. When none of them is specified, a sample image appropriate for the task is selected
automatically.
If no display is connected to the development board or if you are working over SSH, you need to use the
`--no-display` option. To view the result, you can save the output to a file with the `--save` option.
### Synchronous and Asynchronous Templates
The example applications are provided in two forms, `_sync` and `_async`.
* **Synchronous (`_sync`)** templates execute the pre-processing, inference and post-processing steps
sequentially. They are suitable for working on a single image and for debugging.
* **Asynchronous (`_async`)** templates allow the CPU to prepare frame number `N+1` while the NPU is
processing frame number `N`. They should be preferred in order to maximize the frame rate on video
streams.
## Video Processing with DX-STREAM
DX-STREAM is the set of plugins that adds DEEPX NPU support to the GStreamer framework. Thanks to this,
images coming from a camera, a video file or an RTSP stream can be processed within a pipeline.
### Plugin Elements
| Element | Description |
| --------------- | ---------------------------------------------------------------------------- |
| `dxpreprocess` | Converts the frame into the size and format expected by the model |
| `dxinfer` | Performs the inference on the NPU |
| `dxpostprocess` | Converts the model output into meaningful metadata (bounding boxes, classes) |
| `dxtracker` | Tracks detected objects across frames |
| `dxosd` | Draws the results onto the video frames |
| `dxgather` | Merges branches into a single output in multi-stream pipelines |
| `dxrate` | Limits the frame rate at which inference is performed |
| `dxmsgconv` | Converts metadata into a message format |
| `dxmsgbroker` | Forwards messages to an external server (for example MQTT) |
You can inspect the installed plugins and their properties with the `gst-inspect-1.0` tool.
```bash theme={"system"}
gst-inspect-1.0 dxinfer
```
### Example Pipeline
The pipeline below reads a video file, performs object detection with a YOLO model, draws the results onto
the frames and saves them into a video file.
```bash theme={"system"}
gst-launch-1.0 urisourcebin uri=file:///home/gemstone/dx_app/assets/videos/snowboard.mp4 ! decodebin ! \
dxpreprocess \
preprocess-id=1 \
resize-width=640 \
resize-height=640 ! \
queue max-size-buffers=1 ! \
dxinfer \
preprocess-id=1 \
inference-id=1 \
model-path=/home/gemstone/dx_app/assets/models/yolov7_640x640.dxnn ! \
queue max-size-buffers=1 ! \
dxpostprocess \
inference-id=1 \
library-file-path=/usr/share/gstdxstream/lib/libpostprocess_yolov7.so \
function-name=PostProcess ! \
queue max-size-buffers=1 ! \
dxosd ! \
videoconvert ! jpegenc quality=85 ! avimux ! \
filesink location=/home/gemstone/output.avi
```
The generated output has been saved to `/home/gemstone/output.avi`. You can access it through this file.
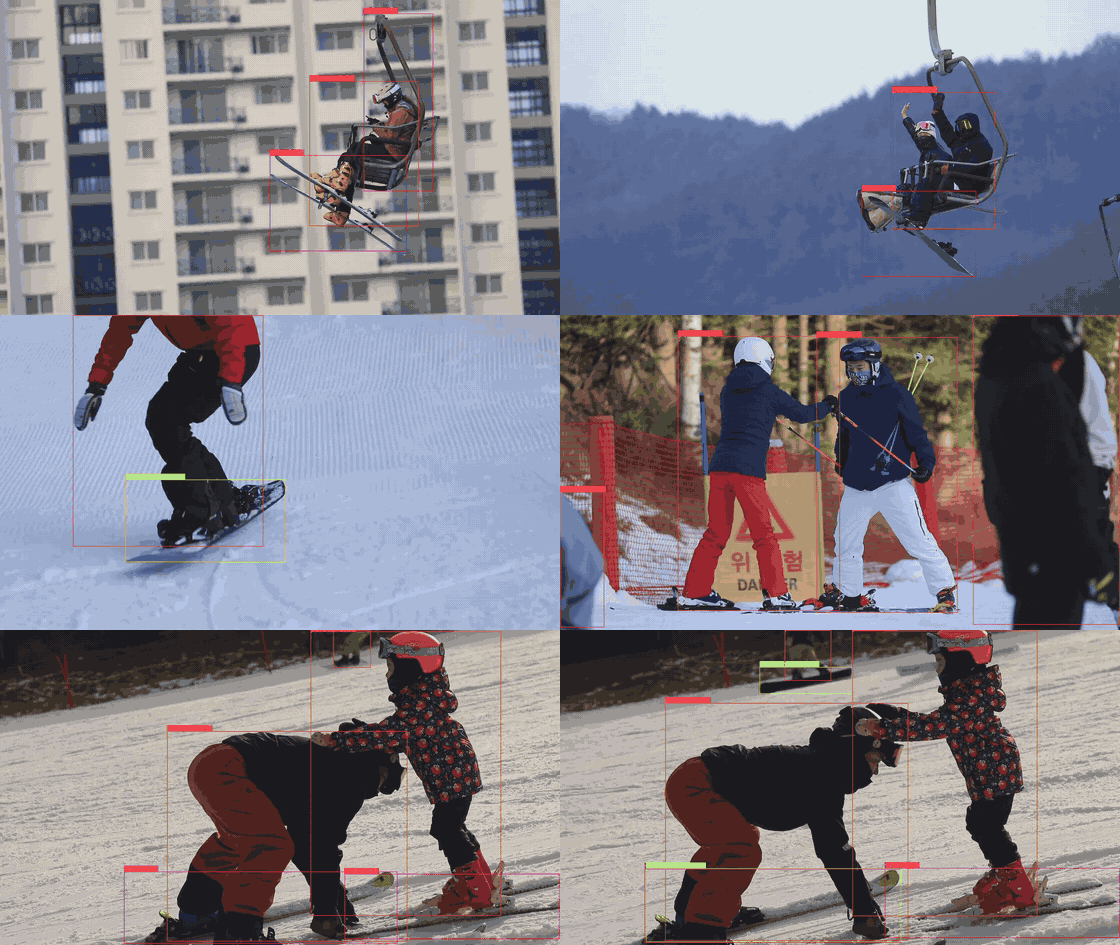 The image above was created with its resolution and duration reduced so that it could be shared as a GIF in
the documentation. The actual output produced by the pipeline is at the resolution of the source video and
at full length.
The pipeline works as follows.
Reads and decodes the video source. The path of the file to be processed is given in the `uri` property.
Resizes the frames according to the `resize-width` and `resize-height` values. The `preprocess-id` value is
used to match the element with the subsequent `dxinfer` element.
Runs the `.dxnn` model specified with `model-path` on the NPU.
Decodes the model output using the shared library specified with `library-file-path`. The library to be used
varies depending on the model family.
Draws the detection results onto the frame.
Converts the frames into the color format expected by the encoder, compresses them as JPEG with the
`quality=85` value and merges the resulting frames into an AVI container.
Writes the generated video to the file specified with `location`.
On systems with a display connected, instead of saving the output to a file you can view it directly on the
screen together with the frame rate information with `videoconvert ! fpsdisplaysink sync=false`. On
installations without an X11 environment, `kmssink` should be preferred over `ximagesink`.
The `queue` elements allow the pipeline to work asynchronously. When these elements are removed, the frame
rate decreases because each stage waits for the previous one to finish.
### Adding Object Tracking
When the `dxtracker` element is added after object detection, an identity (track ID) is assigned to the
detected objects across frames.
```bash theme={"system"}
... ! dxpostprocess ... ! queue max-size-buffers=1 ! dxtracker ! queue ! dxosd ! ...
```
The `dxtracker` element needs bounding box information. For this reason it must be placed after the object
detection step within the pipeline.
## Resources
Example application templates
GStreamer plugins and ready-made pipelines
Runtime source code and API examples
Pre-compiled model repository
Build recipes producing the kernel module, DX-RT runtime and GStreamer plugin Debian packages for
T3 Gemstone
The official model repository where pre-compiled `.dxnn` models are listed and can be downloaded
The image above was created with its resolution and duration reduced so that it could be shared as a GIF in
the documentation. The actual output produced by the pipeline is at the resolution of the source video and
at full length.
The pipeline works as follows.
Reads and decodes the video source. The path of the file to be processed is given in the `uri` property.
Resizes the frames according to the `resize-width` and `resize-height` values. The `preprocess-id` value is
used to match the element with the subsequent `dxinfer` element.
Runs the `.dxnn` model specified with `model-path` on the NPU.
Decodes the model output using the shared library specified with `library-file-path`. The library to be used
varies depending on the model family.
Draws the detection results onto the frame.
Converts the frames into the color format expected by the encoder, compresses them as JPEG with the
`quality=85` value and merges the resulting frames into an AVI container.
Writes the generated video to the file specified with `location`.
On systems with a display connected, instead of saving the output to a file you can view it directly on the
screen together with the frame rate information with `videoconvert ! fpsdisplaysink sync=false`. On
installations without an X11 environment, `kmssink` should be preferred over `ximagesink`.
The `queue` elements allow the pipeline to work asynchronously. When these elements are removed, the frame
rate decreases because each stage waits for the previous one to finish.
### Adding Object Tracking
When the `dxtracker` element is added after object detection, an identity (track ID) is assigned to the
detected objects across frames.
```bash theme={"system"}
... ! dxpostprocess ... ! queue max-size-buffers=1 ! dxtracker ! queue ! dxosd ! ...
```
The `dxtracker` element needs bounding box information. For this reason it must be placed after the object
detection step within the pipeline.
## Resources
Example application templates
GStreamer plugins and ready-made pipelines
Runtime source code and API examples
Pre-compiled model repository
Build recipes producing the kernel module, DX-RT runtime and GStreamer plugin Debian packages for
T3 Gemstone
The official model repository where pre-compiled `.dxnn` models are listed and can be downloaded