> ## Documentation Index
> Fetch the complete documentation index at: https://docs.t3gemstone.org/llms.txt
> Use this file to discover all available pages before exploring further.
# Serial Port
> Serial Port Usage
export const int_0 = "Interface"
export const device_0 = "Device"
export const file_0 = "Overlay File"
By the end of this section, you will gain experience in the following topics:
* Establishing a serial port connection between the developer's computer and the Gemstone board using a USB TTL cable.
* Communicating between both computers via a terminal.
* Preliminary preparation for the [t3gemstone/examples/serial](https://github.com/t3gemstone/examples/tree/main/serial) project.
A serial port is a communication channel that enables data transmission between devices such as computers and
microcontrollers. This communication typically occurs via the `UART (Universal Asynchronous Receiver-Transmitter)`
protocol and is ideal for low-speed data transmission. For example, serial ports are often preferred when
communicating with external modules like GPS or Radio Transmitters.
### Serial Port Interfaces
The serial port interfaces on the T3-GEM-O1 card are listed in the table below.
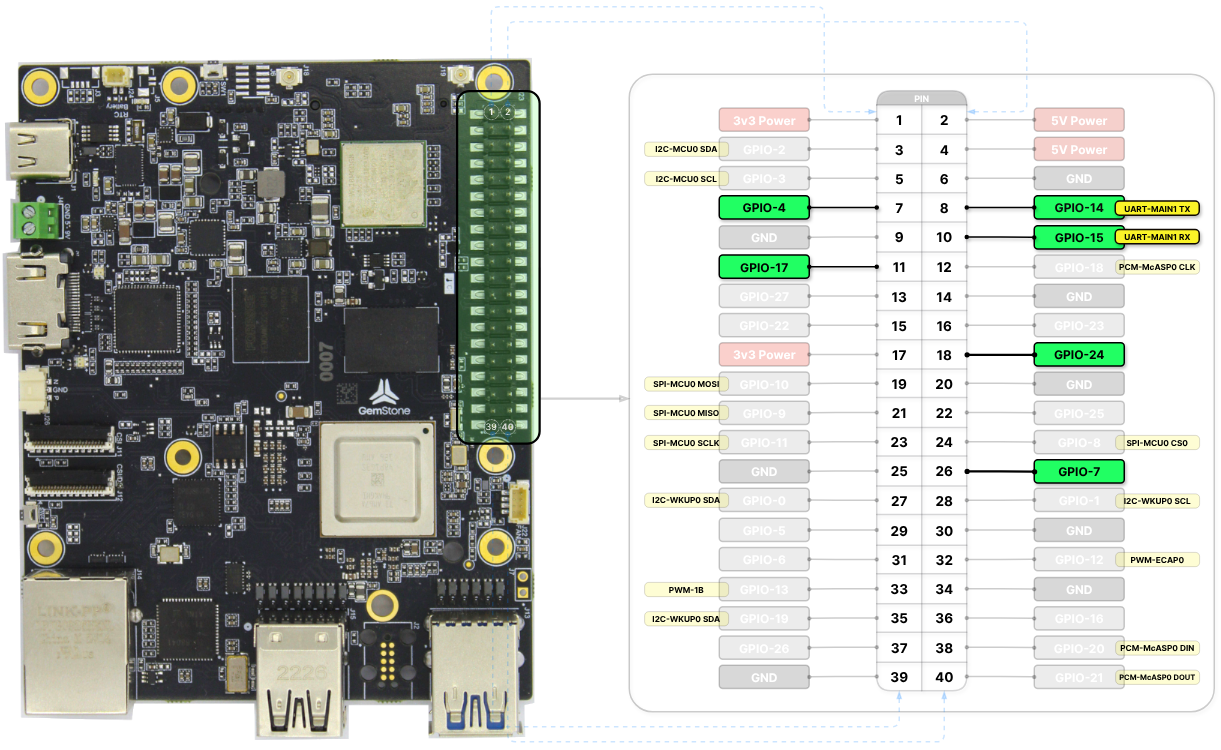
 | {int_0} | {device_0} | GPIO (RX) | GPIO (TX) | {file_0} |
| -------------- | ---------- | ------------- | ------------- | ------------------------------------ |
| **UART-MAIN0** | `ttyS2` | Serial Header | Serial Header | |
| **UART-MAIN1** | `ttyS3` | GPIO-15 | GPIO-14 | |
| **UART-MAIN6** | `ttyS6` | GPIO-4 | GPIO-17 | `k3-am67a-t3-gem-o1-uart-ttys6.dtbo` |
| **UART-WKUP0** | `ttyS0` | GPIO-7 | GPIO-24 | `k3-am67a-t3-gem-o1-uart-ttys0.dtbo` |
* Access to the Linux terminal is obtained from the UART‑MAIN0 serial port.
* When the `k3-am67a-t3-gem-o1-pwm-epwm0-gpio5-gpio14.dtso` overlay is enabled, the UART‑MAIN1 TX pin is disabled, while
the RX pin continues to function normally.
* Bluetooth becomes disabled when the UART‑MAIN6 serial port is activated.
The names of the overlay files for the interfaces to be enabled must be added to the `overlays` variable
in the `/boot/uEnv.txt` file. Detailed information about overlays can be found in the
[Device Tree](./introduction/#2-device-tree) section.
### Serial Port Usage
Connect to the development board using one of the methods: [SSH](../../../quickstart#2-3-network-connection-via-ssh) or
[VNC](../../../quickstart#2-2-remote-desktop-connection-via-browser-with-vnc).
Create Bash Shell scripts.
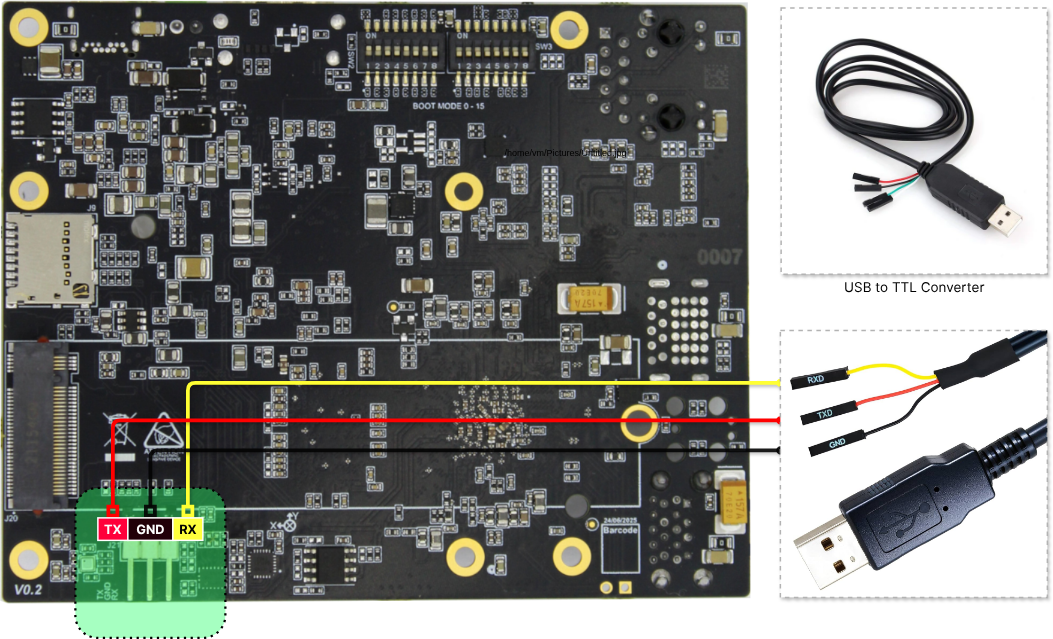
Connect the developer's computer and the Gemstone board using a TTL cable and perform data exchange via the Tabby.sh terminal.
#### 1. Creating a Shell Script
Create a script file for opening the serial port and sending data.
```bash theme={"system"}
touch serial-test.sh
```
#### 2. Using a Text Editor
Open the `serial-test.sh` file using the `nano` text editor from the terminal interface.
```bash theme={"system"}
nano serial-test.sh
```
After copying the following code, paste it into the `serial-test.sh` file.
```bash lines theme={"system"}
#!/bin/bash
SERIAL_PORT="/dev/ttyS3"
BAUD_RATE="115200"
stty -F /dev/ttyS3 115200 -crtscts
while true; do
echo "Teknofest" > $SERIAL_PORT
sleep 1
done
```
Press `CTRL+X`, then press `Y` to save and exit the nano editor.
#### 3. Running the Shell Script
Make the `serial-test.sh` file executable using the `chmod` command and start it.
```bash Terminal lines theme={"system"}
chmod +x serial-test.sh
./serial-test.sh
```
```bash Output lines theme={"system"}
```
#### 4. Communication
| {int_0} | {device_0} | GPIO (RX) | GPIO (TX) | {file_0} |
| -------------- | ---------- | ------------- | ------------- | ------------------------------------ |
| **UART-MAIN0** | `ttyS2` | Serial Header | Serial Header | |
| **UART-MAIN1** | `ttyS3` | GPIO-15 | GPIO-14 | |
| **UART-MAIN6** | `ttyS6` | GPIO-4 | GPIO-17 | `k3-am67a-t3-gem-o1-uart-ttys6.dtbo` |
| **UART-WKUP0** | `ttyS0` | GPIO-7 | GPIO-24 | `k3-am67a-t3-gem-o1-uart-ttys0.dtbo` |
* Access to the Linux terminal is obtained from the UART‑MAIN0 serial port.
* When the `k3-am67a-t3-gem-o1-pwm-epwm0-gpio5-gpio14.dtso` overlay is enabled, the UART‑MAIN1 TX pin is disabled, while
the RX pin continues to function normally.
* Bluetooth becomes disabled when the UART‑MAIN6 serial port is activated.
The names of the overlay files for the interfaces to be enabled must be added to the `overlays` variable
in the `/boot/uEnv.txt` file. Detailed information about overlays can be found in the
[Device Tree](./introduction/#2-device-tree) section.
### Serial Port Usage
Connect to the development board using one of the methods: [SSH](../../../quickstart#2-3-network-connection-via-ssh) or
[VNC](../../../quickstart#2-2-remote-desktop-connection-via-browser-with-vnc).
Create Bash Shell scripts.
Connect the developer's computer and the Gemstone board using a TTL cable and perform data exchange via the Tabby.sh terminal.
#### 1. Creating a Shell Script
Create a script file for opening the serial port and sending data.
```bash theme={"system"}
touch serial-test.sh
```
#### 2. Using a Text Editor
Open the `serial-test.sh` file using the `nano` text editor from the terminal interface.
```bash theme={"system"}
nano serial-test.sh
```
After copying the following code, paste it into the `serial-test.sh` file.
```bash lines theme={"system"}
#!/bin/bash
SERIAL_PORT="/dev/ttyS3"
BAUD_RATE="115200"
stty -F /dev/ttyS3 115200 -crtscts
while true; do
echo "Teknofest" > $SERIAL_PORT
sleep 1
done
```
Press `CTRL+X`, then press `Y` to save and exit the nano editor.
#### 3. Running the Shell Script
Make the `serial-test.sh` file executable using the `chmod` command and start it.
```bash Terminal lines theme={"system"}
chmod +x serial-test.sh
./serial-test.sh
```
```bash Output lines theme={"system"}
```
#### 4. Communication