> ## Documentation Index
> Fetch the complete documentation index at: https://docs.t3gemstone.org/llms.txt
> Use this file to discover all available pages before exploring further.
# Using eMMC
> Using eMMC instead of an SD card as storage
By the end of this section, you will know how to write an image onto eMMC on the Gemstone development board.
The Gemstone operating system supports booting from eMMC in addition to an SD card.
eMMC is a high-performance and reliable storage solution. Because it offers faster data access
and a more robust physical structure compared to an SD card, it is preferred as the primary
option in many applications.
## 1. Writing an Image to eMMC with USB DFU
USB DFU (Device Firmware Upgrade) is the standard that allows the T3 Gemstone O1 to be programmed
directly over USB. An image can be written to eMMC without needing an SD card or a running system.
Official DFU documentation for the TI AM67A processor:
[USB Device Firmware Upgrade (DFU) — Processor SDK Linux for AM67A](https://software-dl.ti.com/jacinto7/esd/processor-sdk-linux-am67a/10_00_00/exports/docs/linux/Foundational_Components/U-Boot/UG-DFU.html)
### 1.1. Switching to USB DFU Mode
**Fully power off the board before starting the process.**
Attempting to switch to DFU mode while the board is running may corrupt the eMMC.
If the operating system is running, shut it down properly, then disconnect the power from the T3 Gemstone O1.
Using the switch position shown in the diagram below as a reference, set the bootmode switch to the USB DFU position.
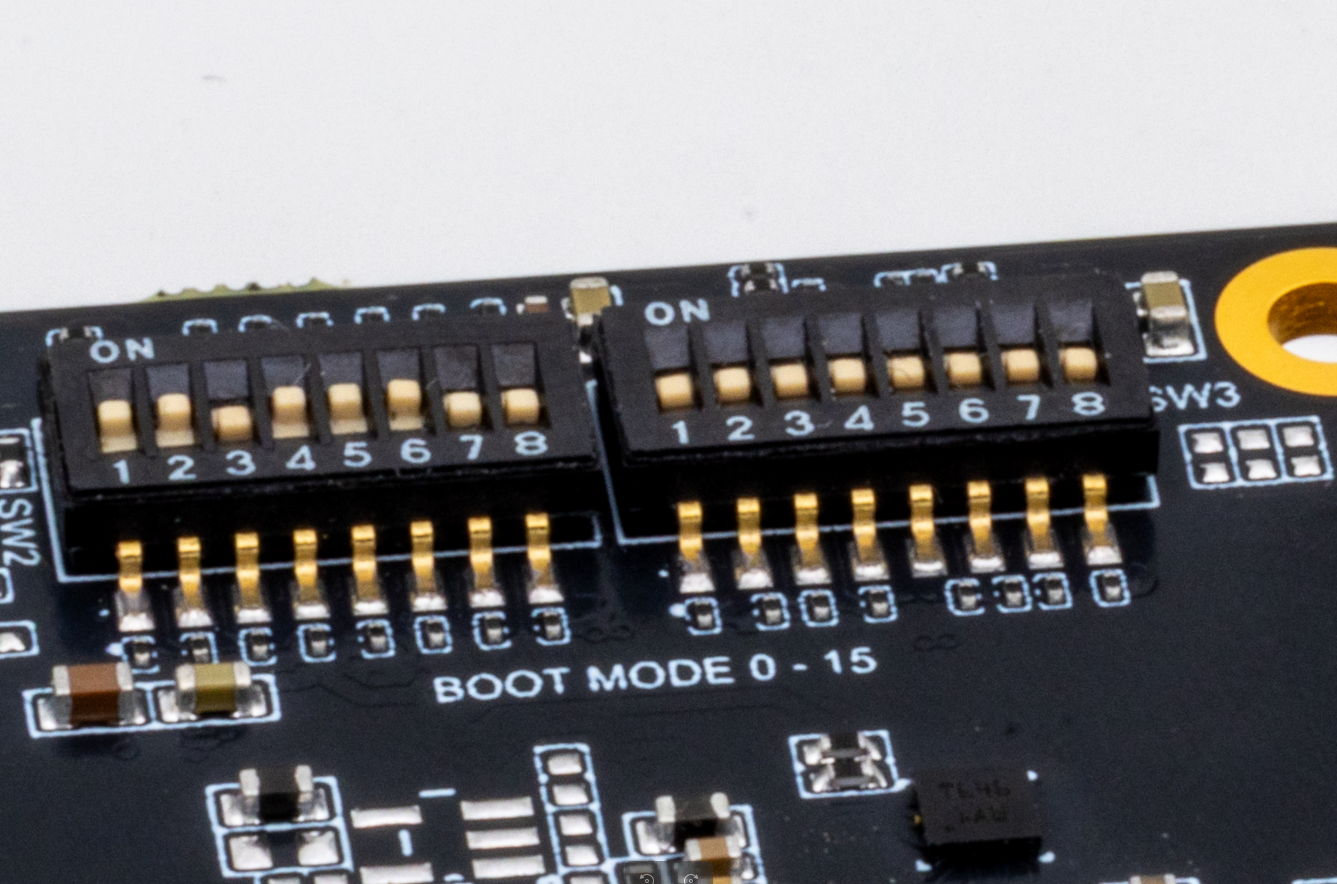 The image above is included to show the physical location of the bootmode switch on the board and is representative.
For DFU mode, follow the switch position from the diagram below.
The image above is included to show the physical location of the bootmode switch on the board and is representative.
For DFU mode, follow the switch position from the diagram below.
 Plug the USB-C cable into the board's DFU port and into your computer, then power it on.
### 1.2. Loading the Image with GemImager
GemImager automatically manages the entire DFU writing process — the bootloader files are shipped
together with the operating system image and are loaded in the correct order.
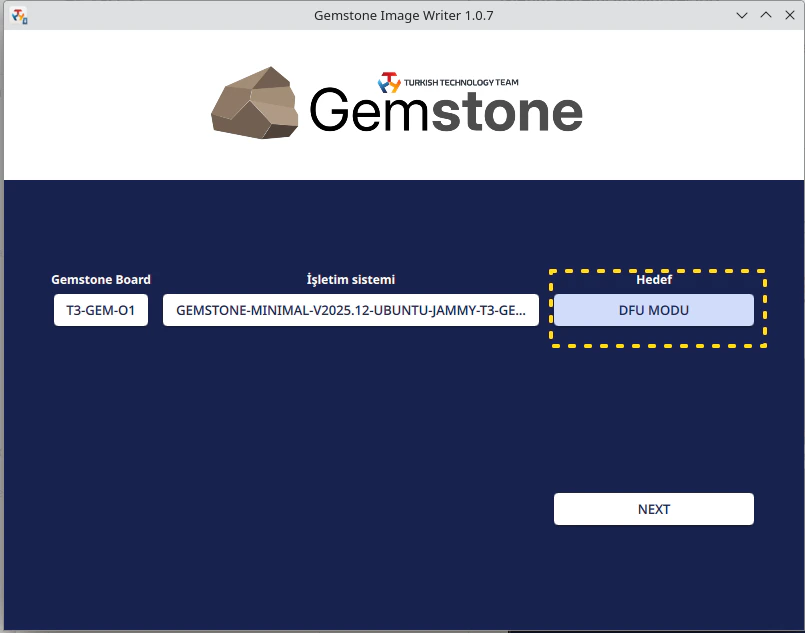
Launch **GemImager** on your computer and select the board you want to use.
In order for GemImager to access USB devices, it must be **run as administrator**.
Click the **Choose OS** button and select the image you want to write.
Click the **Choose Target** button and select the **USB DFU** option.
Plug the USB-C cable into the board's DFU port and into your computer, then power it on.
### 1.2. Loading the Image with GemImager
GemImager automatically manages the entire DFU writing process — the bootloader files are shipped
together with the operating system image and are loaded in the correct order.
Launch **GemImager** on your computer and select the board you want to use.
In order for GemImager to access USB devices, it must be **run as administrator**.
Click the **Choose OS** button and select the image you want to write.
Click the **Choose Target** button and select the **USB DFU** option.
 Click the **Next** button to configure the OS customization options (see the
[Customization](/en/imager/customization) page), then press the **Write** button.
Do not unplug the USB cable or disconnect the power during the writing process.
When the writing process is complete, Gem Imager displays a success message.
Fully power off the board, then set the bootmode switch to the **eMMC** position as shown in
the image below.
Click the **Next** button to configure the OS customization options (see the
[Customization](/en/imager/customization) page), then press the **Write** button.
Do not unplug the USB cable or disconnect the power during the writing process.
When the writing process is complete, Gem Imager displays a success message.
Fully power off the board, then set the bootmode switch to the **eMMC** position as shown in
the image below.
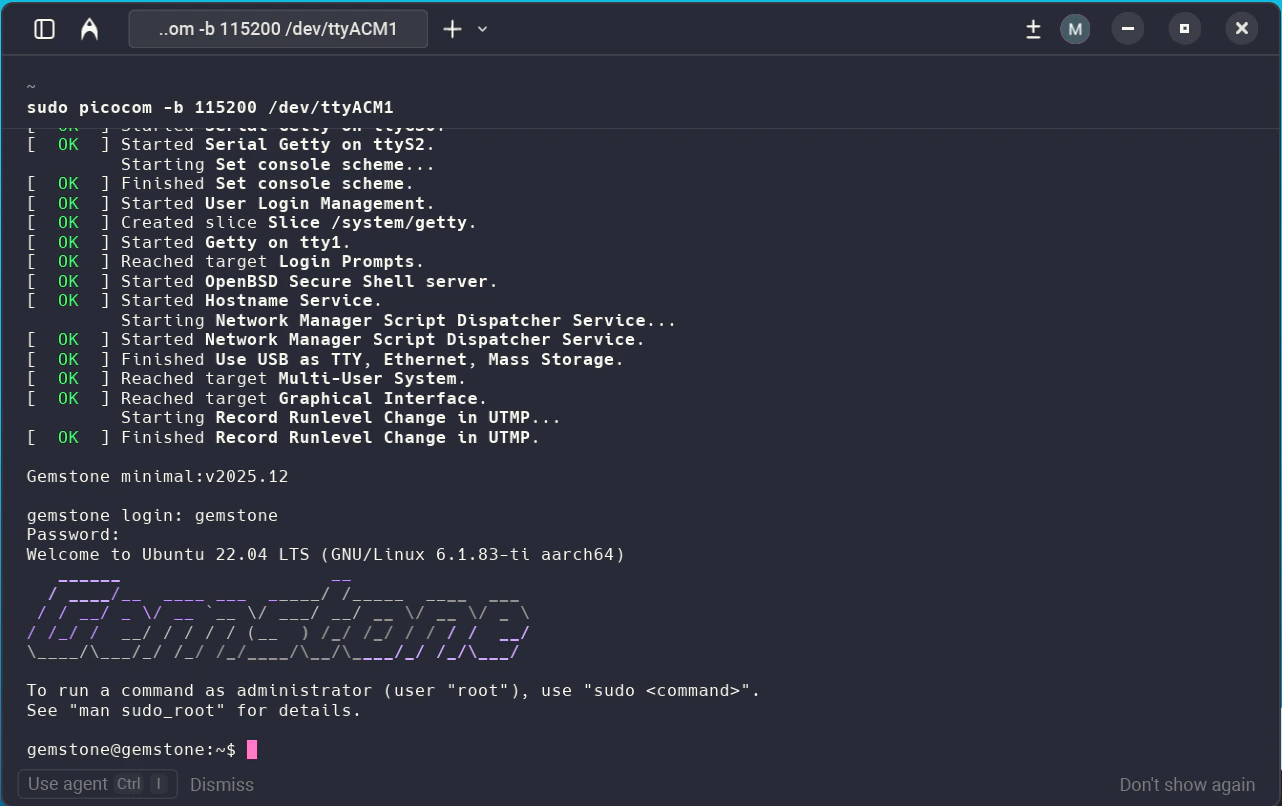
 You can monitor the boot process via a serial port connection over UART.
Default baudrate: **115200**
After applying power, the board will boot from the image on the eMMC.
You can monitor the boot process via a serial port connection over UART.
Default baudrate: **115200**
After applying power, the board will boot from the image on the eMMC.
 For more information about the UART connection, see the [Serial Port](/en/boards/o1/peripherals/serial) page.
## 2. Manual Image Loading with the SDK (dfu-util)
This method is for developers working with the SDK build system.
For more information about building an image from source, see the [SDK documentation](/en/sdk/introduction).
Put the board into DFU mode using the bootmode switch as described in
[1.1. Switching to USB DFU Mode](#1-1-switching-to-usb-dfu-mode), then run the following commands in order.
After a successful SDK build, the required files are located in two directories:
| File | Location |
| ---------------- | --------------------------------------------- |
| `tiboot3.bin` | `build/t3-gem-o1/deploy-ti/images/t3-gem-o1/` |
| `tispl.bin` | `build/t3-gem-o1/deploy-ti/images/t3-gem-o1/` |
| `u-boot.img` | `build/t3-gem-o1/deploy-ti/images/t3-gem-o1/` |
| `gemstone-*.img` | `build/debos/` |
```bash theme={"system"}
sudo dfu-util -d 0451:6165 -a bootloader -D tiboot3.bin -R
```
After this step, the board will reset and reconnect. Wait a few seconds and verify that the
board is still visible with `dfu-util -l`.
```bash theme={"system"}
sudo dfu-util -d 0451:6165 -a tispl.bin -D tispl.bin -R
```
```bash theme={"system"}
sudo dfu-util -d 0451:6165 -a u-boot.img -D u-boot.img -R
```
Replace `` with the name of your own image file:
```bash theme={"system"}
sudo dfu-util -d 0451:6165 -a rawemmc \
-D .img -R
```
This step transfers the entire OS image to the eMMC over USB. Do not interrupt the transfer.
Depending on the image size and USB speed, this process may take several minutes.
When `dfu-util` reports success, fully power off the board, then set the bootmode switch to the
**eMMC** position.
You can monitor the boot process via a serial port connection over UART.
Default baudrate: **115200**
After applying power, the board will boot from the image on the eMMC.
### 2.1. Verification Step
When writing with GemImager DFU, the following operations are performed in order:
1. Downloads or reads the selected image
2. Extracts the bootloader files (`tiboot3.bin`, `tispl.bin`, `u-boot.img`)
3. Writes each bootloader stage over DFU
4. Transfers the full OS image to the eMMC (`rawemmc` alt setting)
Verify that the board appears as a DFU device.
If the application named `dfu-util` is not installed, install it on your Ubuntu computer with the `sudo apt install dfu-util` command.
```bash theme={"system"}
sudo dfu-util -l
```
Download the `dfu-util` Windows binary from the Releases section of the
[dfu-util homepage](https://dfu-util.sourceforge.net/) and extract the zip, then run it:
```powershell theme={"system"}
dfu-util.exe -l
```
If the output of `dfu-util.exe -l` is empty on Windows, you need to install the **WinUSB**
driver on the device using [Zadig](https://zadig.akeo.ie/):
1. Download and run Zadig from [zadig.akeo.ie](https://zadig.akeo.ie/)
(no installation required; it will request UAC administrator approval)
2. If the board does not appear in the list, enable the **Options → List All Devices** option
3. From the drop-down list, select the device with VID `0451` / PID `6165`
4. Select **WinUSB** as the driver and click the **Install Driver** button
5. When the installation is complete, the driver name will be displayed in green
You should see an entry with VID:PID **0451:6165** containing the `bootloader` and `SocId`
alt settings.
```
Found DFU: [0451:6165] ver=0200, devnum=9, cfg=1, intf=0, path="1-2.2", alt=1, name="SocId", serial="01.00.00.00"
Found DFU: [0451:6165] ver=0200, devnum=9, cfg=1, intf=0, path="1-2.2", alt=0, name="bootloader", serial="01.00.00.00"
```
If the device does not appear in the list, try again starting from step 1.
For more information about the UART connection, see the [Serial Port](/en/boards/o1/peripherals/serial) page.
## 2. Manual Image Loading with the SDK (dfu-util)
This method is for developers working with the SDK build system.
For more information about building an image from source, see the [SDK documentation](/en/sdk/introduction).
Put the board into DFU mode using the bootmode switch as described in
[1.1. Switching to USB DFU Mode](#1-1-switching-to-usb-dfu-mode), then run the following commands in order.
After a successful SDK build, the required files are located in two directories:
| File | Location |
| ---------------- | --------------------------------------------- |
| `tiboot3.bin` | `build/t3-gem-o1/deploy-ti/images/t3-gem-o1/` |
| `tispl.bin` | `build/t3-gem-o1/deploy-ti/images/t3-gem-o1/` |
| `u-boot.img` | `build/t3-gem-o1/deploy-ti/images/t3-gem-o1/` |
| `gemstone-*.img` | `build/debos/` |
```bash theme={"system"}
sudo dfu-util -d 0451:6165 -a bootloader -D tiboot3.bin -R
```
After this step, the board will reset and reconnect. Wait a few seconds and verify that the
board is still visible with `dfu-util -l`.
```bash theme={"system"}
sudo dfu-util -d 0451:6165 -a tispl.bin -D tispl.bin -R
```
```bash theme={"system"}
sudo dfu-util -d 0451:6165 -a u-boot.img -D u-boot.img -R
```
Replace `` with the name of your own image file:
```bash theme={"system"}
sudo dfu-util -d 0451:6165 -a rawemmc \
-D .img -R
```
This step transfers the entire OS image to the eMMC over USB. Do not interrupt the transfer.
Depending on the image size and USB speed, this process may take several minutes.
When `dfu-util` reports success, fully power off the board, then set the bootmode switch to the
**eMMC** position.
You can monitor the boot process via a serial port connection over UART.
Default baudrate: **115200**
After applying power, the board will boot from the image on the eMMC.
### 2.1. Verification Step
When writing with GemImager DFU, the following operations are performed in order:
1. Downloads or reads the selected image
2. Extracts the bootloader files (`tiboot3.bin`, `tispl.bin`, `u-boot.img`)
3. Writes each bootloader stage over DFU
4. Transfers the full OS image to the eMMC (`rawemmc` alt setting)
Verify that the board appears as a DFU device.
If the application named `dfu-util` is not installed, install it on your Ubuntu computer with the `sudo apt install dfu-util` command.
```bash theme={"system"}
sudo dfu-util -l
```
Download the `dfu-util` Windows binary from the Releases section of the
[dfu-util homepage](https://dfu-util.sourceforge.net/) and extract the zip, then run it:
```powershell theme={"system"}
dfu-util.exe -l
```
If the output of `dfu-util.exe -l` is empty on Windows, you need to install the **WinUSB**
driver on the device using [Zadig](https://zadig.akeo.ie/):
1. Download and run Zadig from [zadig.akeo.ie](https://zadig.akeo.ie/)
(no installation required; it will request UAC administrator approval)
2. If the board does not appear in the list, enable the **Options → List All Devices** option
3. From the drop-down list, select the device with VID `0451` / PID `6165`
4. Select **WinUSB** as the driver and click the **Install Driver** button
5. When the installation is complete, the driver name will be displayed in green
You should see an entry with VID:PID **0451:6165** containing the `bootloader` and `SocId`
alt settings.
```
Found DFU: [0451:6165] ver=0200, devnum=9, cfg=1, intf=0, path="1-2.2", alt=1, name="SocId", serial="01.00.00.00"
Found DFU: [0451:6165] ver=0200, devnum=9, cfg=1, intf=0, path="1-2.2", alt=0, name="bootloader", serial="01.00.00.00"
```
If the device does not appear in the list, try again starting from step 1.