This section will cover how models are prepared for purposes such as object recognition in image processing operations.
If you have completed the installation of the edgeai-tensorlab project described in the previous section, you can compile your model in 3 steps.
Download and Install Project
Get the edgeai-tensorlab project ready and enter the distrobox
Edit Config File
Edit the config file according to the model you want to prepare
Compile Model
Start the model compilation
1. Configuration Files
Configuration files allow the EdgeAI-ModelMaker tool to execute the entire flow from training to compilation in a configurable manner.
By defining project-specific parameters in these files, the user can create their own unique model.
As an example, sample configuration files for 4 main image processing types are provided inside the configs folder.
2. Object Classification
The object classification configuration file included in EdgeAI Model Maker is used to define the model training and evaluation processes.
This file contains information such as the dataset path, training parameters (e.g., batch size, number of epochs, and learning rate), model architecture (e.g., MobileNetV2 or RegNetX), and optimization settings.
Below is the content of a sample object classification configuration file.
common:
    target_module: 'vision'
    task_type: 'classification'
    target_device: 'AM67A'
    # run_name can be any string, but there are some special cases:
    # {date-time} will be replaced with datetime.datetime.now().strftime("%Y%m%d-%H%M%S")
    # {model_name} will be replaced with the name of the model
    run_name: '{date-time}/{model_name}'

dataset:
    # enable/disable dataset loading
    enable: True #False
    # max_num_files: [1000, 250] #None

    # Image Classification Dataset Examples:
    # -------------------------------------
    # Example 1, (known datasets): 'oxford_flowers102'
    # dataset_name: oxford_flowers102
    # -------------------------------------
    # Example 2, give a dataset_name and input_data_path.
    # input_data_path could be a path to zip file, tar file, folder OR http, https link to zip or tar files
    # for input_data_path these are provided with this repository as examples:
    #    'http://software-dl.ti.com/jacinto7/esd/modelzoo/08_06_00_01/datasets/animal_classification.zip'
    # -------------------------------------
    dataset_name: animal_classification
    input_data_path: 'http://software-dl.ti.com/jacinto7/esd/modelzoo/08_06_00_01/datasets/animal_classification.zip'

training:
    # enable/disable training
    enable: True #False

    # Image Classification model chosen can be changed here if needed
    # options are: 'mobilenet_v2_lite', 'regnet_x_400mf', 'regnet_x_800mf'
    model_name: 'mobilenet_v2_lite'

    # training_epochs: 15 #30
    # batch_size: 64 #8 #32
    # learning_rate: 0.005
    # num_gpus: 0 #1 #4

compilation:
    # enable/disable compilation
    enable: True #False
    # tensor_bits: 8 #16 #32
Dataset Path (You can enter a path from a website or your file system.)
MODEL_NAME
default:"mobilenet_v2_lite"
required
You are expected to enter the base model you will use for object classification.
Currently supported models: mobilenet_v2_lite, regnet_x_400mf, regnet_x_800mf
Number of epochs to be used in training
Batch size to be used in training
Number of GPUs to be used
2.1. MobileNet V2
MobileNet V2 is a convolutional neural network (CNN) architecture developed by Google that provides high efficiency especially in constrained hardware like embedded systems and mobile devices.
The model offers higher accuracy with fewer parameters compared to the previous version, MobileNet V1. It achieves this through two key structures called Inverted Residual Block and Linear Bottleneck.
Thanks to these features:
- Model size is reduced.
- Computational cost decreases.
- High speed is achieved in real-time applications.
The configuration file included in EdgeAI Model Maker contains the parameters for the lite (lower resource consumption) version of this architecture and is preferred because it is generally used in object classification tasks.
2.2. RegNet
RegNet is a family of scalable network architectures developed by Facebook AI Research (FAIR).
RegNet models have a design philosophy where configuration parameters (e.g., number of channels, number of blocks, width ratio) can be systematically changed.
This way, models can be created using the same architectural logic across different hardware, from small embedded devices to large server environments.
- RegNetX-400MF: A lightweight version with a computational cost around 400 million FLOPs.
- RegNetX-800MF: A version that offers higher accuracy, suitable for mid-level resources.
These models are preferred especially in classification projects that require a balance between efficiency and accuracy.
3. Object Detection
The object detection configuration file included in EdgeAI Model Maker is used to define the model training and evaluation processes.
Below is the content of a sample object detection configuration file.
common:
    target_module: 'vision'
    task_type: 'detection'
    target_device: 'AM67A'
    # run_name can be any string, but there are some special cases:
    # {date-time} will be replaced with datetime.datetime.now().strftime("%Y%m%d-%H%M%S")
    # {model_name} will be replaced with the name of the model
    run_name: '{date-time}/{model_name}'

dataset:
    # enable/disable dataset loading
    enable: True #False
    # max_num_files: [750, 250] #None

    # Object Detection Dataset Examples:
    # -------------------------------------
    # Example 1, (known datasets): 'widerface_detection', 'pascal_voc0712', 'coco_detection', 'udacity_selfdriving', 'tomato_detection', 'tiscapes2017_driving'
    # dataset_name: widerface_detection
    # -------------------------------------
    # Example 2, give a dataset name and input_data_path.
    # input_data_path could be a path to zip file, tar file, folder OR http, https link to zip or tar files
    # for input_data_path these are provided with this repository as examples:
    #    'http://software-dl.ti.com/jacinto7/esd/modelzoo/08_06_00_01/datasets/tiscapes2017_driving.zip'
    #    'http://software-dl.ti.com/jacinto7/esd/modelzoo/08_06_00_01/datasets/animal_detection.zip'
    # -------------------------------------
    # Example 3, give image folders with annotation files (require list with values for both train and val splits)
    # dataset_name: coco_detection
    # input_data_path: ["./data/projects/coco_detection/dataset/train2017",
    #                        "./data/projects/coco_detection/dataset/val2017"]
    # input_annotation_path: ["./data/projects/coco_detection/dataset/annotations/instances_train2017.json",
    #                        "./data/projects/coco_detection/dataset/annotations/instances_val2017.json"]
    # -------------------------------------
    dataset_name: tiscapes2017_driving
    input_data_path: 'http://software-dl.ti.com/jacinto7/esd/modelzoo/08_06_00_01/datasets/tiscapes2017_driving.zip'

training:
    # enable/disable training
    enable: True #False

    # Object Detection model chosen can be changed here if needed
    # options are: 'yolox_s_lite', 'yolox_tiny_lite', 'yolox_nano_lite', 'yolox_pico_lite', 'yolox_femto_lite', 'yolov7_l_lite'
    model_name: 'yolox_nano_lite'

    # training_epochs: 15 #30
    # batch_size: 8 #32
    # learning_rate: 0.005
    # num_gpus: 0 #1 #4

compilation:
    # enable/disable compilation
    enable: True #False
    # tensor_bits: 8 #16 #32
Dataset Path (You can enter a path from a website or your file system.)
MODEL_NAME
default:"yolox_s_lite"
required
You are expected to enter the base model you will use for object detection.
Currently supported models: yolox_s_lite, yolox_tiny_lite, yolox_nano_lite, yolox_pico_lite, yolox_femto_lite, yolov7_l_lite
Number of epochs to be used in training
Batch size to be used in training
Number of GPUs to be used
3.1. What is YOLO?
YOLO (You Only Look Once) is a deep learning-based algorithm developed for real-time object detection.
YOLO predicts the classes and locations of objects in an image in a single forward pass.
This approach, unlike traditional two-stage methods (e.g., R-CNN), performs both classification and localization operations in a single stage.
The YOLO algorithm divides the input into a grid structure.
Each cell represents a specific region in the image and for possible objects in this region, it predicts:
- Class probabilities,
- Coordinate information (x, y, width, height),
- Confidence scores
Thus, the model analyzes all objects in the image simultaneously and produces output at high speed.
The most important advantage of YOLO is that it provides speed and real-time capability.
This feature is of great importance especially in embedded systems, robotics applications, and autonomous vehicles.
However, the accuracy rate may be lower compared to other methods for small-sized objects or in dense scenes.
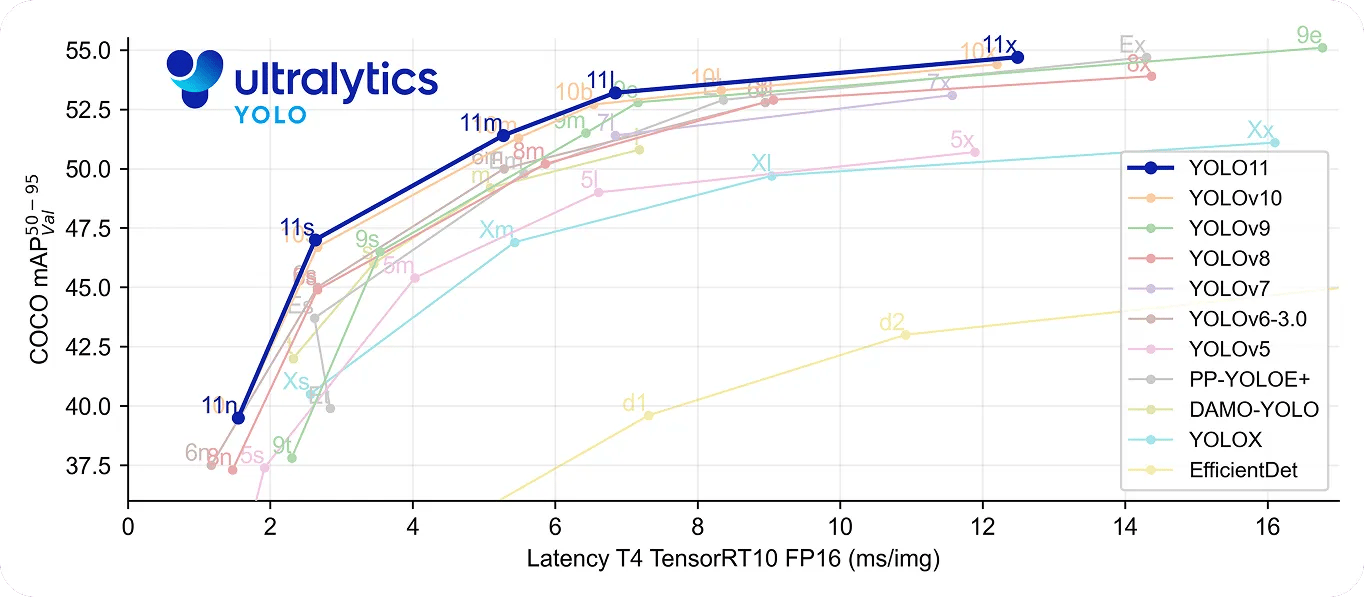
Over time, the YOLO algorithm has been developed with different versions. Significant improvements have been made in both model architecture and performance in versions from YOLOv1 to YOLOv11.
3.2. Keypoint Detection
The keypoint detection configuration file included in EdgeAI Model Maker is used to define the model training and evaluation processes.
Keypoint Detection defines the training and evaluation parameters of the model for detecting the positions of specific points on an image (e.g., joints on the human body, reference points on the face, or characteristic corner points of objects).
Below is the content of a sample keypoint detection configuration file.
common:
    target_module: 'vision'
    task_type: 'keypoint_detection'
    target_device: 'AM67A'
    # run_name can be any string, but there are some special cases:
    # {date-time} will be replaced with datetime.datetime.now().strftime("%Y%m%d-%H%M%S")
    # {model_name} will be replaced with the name of the model
    run_name: '{date-time}/{model_name}'

# Need to modify later according to the data loaders
dataset:
    # enable/disable dataset loading
    enable: True #False

    # specify annotation prefix (of th annotation file) if needed - default is 'instances'.
    # annotation_prefix: person_keypoints
    # specify split names (of th annotation file) if needed - default is ['train', 'val'].
    # split_names: ['train2017', 'val2017']
    # specify max number of files to get split (of th annotation file) if needed - default is [750, 250].
    # max_num_files: [750, 250] #None
    # -------------------------------------
    # Keypoint Detection Dataset Examples:
    #
    # -------------------------------------
    # Example 1, (known datasets): 'coco_kpts'
    # dataset_name: coco_keypoint_detection
    #
    # -------------------------------------
    # Example 2, give a dataset name and input_data_path.
    # dataset_name: coco_keypoints_val2017
    # input_data_path could be a path to zip file, tar file, folder OR http, https link to zip or tar files
    # input_data_path: "./data/downloads/datasets/coco_keypoints_val2017"
    #
    # -------------------------------------
    # Example 3, give image folders with annotation files (require list with values for both train and val splits)
    # dataset_name: coco_keypoint_detection
    # input_data_path: ["./data/projects/coco_keypoint_detection/dataset/train2017",
    #                        "./data/projects/coco_keypoint_detection/dataset/val2017"]
    # input_annotation_path: ["./data/projects/coco_keypoint_detection/dataset/annotations/person_keypoints_train2017.json",
    #                        "./data/projects/coco_keypoint_detection/dataset/annotations/person_keypoints_val2017.json"]
    #
    # -------------------------------------
    # This simple dataset can be constucted by taking images in val2017 and putting in images folder
    # and then taking person_keypoints_val2017.json and renaming it at annotations/instances.json
    dataset_name: coco2017_subset_ccby_x8
    input_data_path: http://tensorlabdata2.dhcp.ti.com/pub/projects/edgeai-algo/data/datasets/modelmaker/public/coco2017_subset_ccby_x8.zip
    input_annotation_path : data/projects/coco2017_subset_ccby_x8/dataset/annotations/person_keypoints.json

training:
    # enable/disable training
    enable: True #False
    # Keypoint Detection model chosen can be changed here if needed
    # Available models: yolox_s_keypoint
    model_name: 'yoloxpose_tiny_lite'
    # training_epochs: 15
    # batch_size: 16 #16
    # learning_rate: 0.001
    # num_gpus: 1

compilation:
    # enable/disable compilation
    enable: True #False
    # tensor_bits: 8 #16 #32
ANNOTATION_PREFIX
default:"instances"
required
Annotation file prefix. Default value is defined as ‘instances’.
SPLIT_NAMES
default:"['train', 'val']"
required
Specifies the names of the training and validation splits in the dataset.
Limits the maximum number of files to be loaded from the training and validation splits.
For example, the value [750, 250] loads 750 training and 250 validation examples.
Dataset Path (You can enter a path from a website or your file system.)
Defines the local path of the annotation file belonging to the dataset.
MODEL_NAME
default:"yolox_s_keypoint"
required
You are expected to enter the base model you will use for keypoint detection.
Currently supported models: yolox_s_keypoint, yoloxpose_tiny_lite
Number of epochs to be used in training
Batch size to be used in training
Number of GPUs to be used
3.3. What is YOLOX-Pose?
YOLOX-Pose is an extension of the popular YOLOX (You Only Look Once - eXtended) architecture, designed to detect keypoints on the human body.
This model, in addition to classic object detection, predicts the joint positions (e.g., shoulder, elbow, knee, ankle, etc.) on a coordinate basis for each detected person.
3.4. What is YOLOX-S-Keypoint?
YOLOX-S-Keypoint is an adapted version of the YOLOX-S model for keypoint detection.
Basically, it extends the fast and lightweight object detection capabilities of YOLOX-S to predict specific points (keypoints) on humans or objects.
4. Image Segmentation
The image segmentation configuration file included in EdgeAI Model Maker is used to define the model training and evaluation processes.
Image Segmentation is the process of dividing an image into meaningful regions.
Each pixel is determined to belong to a class associated with an object or background in the image.
This way, not only the location of the objects but also their exact shapes and boundaries are determined.
Below is the content of a sample image segmentation configuration file.
common:
    target_module: 'vision'
    task_type: 'segmentation'
    target_device: 'AM67A'
    # run_name can be any string, but there are some special cases:
    # {date-time} will be replaced with datetime.datetime.now().strftime("%Y%m%d-%H%M%S")
    # {model_name} will be replaced with the name of the model
    run_name: '{date-time}/{model_name}'

# Need to modify later according to the data loaders
dataset:
    # enable/disable dataset loading
    enable: True #False
    # max_num_files: [750, 250] #None
    # specify annotation prefix (of th annotation file) if neded - default is 'instances'.
    #annotation_prefix: 'stuff'

    # Semantic Segmentation Dataset Examples:
    # -------------------------------------
    # Example 1, (known datasets): 'widerface_detection', 'pascal_voc0712', 'coco_detection', 'udacity_selfdriving', 'tomato_detection', 'tiscapes2017_driving'
    # dataset_name: widerface_detection
    # -------------------------------------
    # Example 2, give a dataset name and input_data_path.
    # input_data_path could be a path to zip file, tar file, folder OR http, https link to zip or tar files
    # for input_data_path these are provided with this repository as examples:
    #    'http://software-dl.ti.com/jacinto7/esd/modelzoo/latest/datasets/tiscapes2017_driving.zip'
    #    'http://software-dl.ti.com/jacinto7/esd/modelzoo/latest/datasets/animal_detection.zip'
    # -------------------------------------
    # Example 3, give image folders with annotation files (require list with values for both train and val splits)
    # dataset_name: coco_detection
    # input_data_path: ["./data/projects/coco_detection/dataset/train2017",
    #                        "./data/projects/coco_detection/dataset/val2017"]
    # input_annotation_path: ["./data/projects/coco_detection/dataset/annotations/instances_train2017.json",
    #                        "./data/projects/coco_detection/dataset/annotations/instances_val2017.json"]
    # -------------------------------------
    dataset_name: tiscapes2017_driving
    input_data_path: "http://software-dlasdasdas.ti.com/jacinto7/esd/modelzoo/latest/datasets/tiscapes2017_driving.zip"

training:
    # enable/disable training
    enable: True #False

    # Semantic segmentation model chosen can be changed here if needed
    # REGNETx800MF: fpn_aspp_regnetx800mf_edgeailite
    # UNET-MOBILENET: unet_aspp_mobilenetv2_tv_edgeailite
    # DEEPLABV3plus-MOBILENET: deeplabv3plus_mobilenetv2_tv_edgeailite

    model_name: 'deeplabv3plus_mobilenetv2_tv_edgeailite'

    #training_epochs: 15 #30
    #batch_size: 32 #8
    #learning_rate: 0.001
    #num_gpus: 0 1 2 3

compilation:
    # enable/disable compilation
    enable: True #False
    # tensor_bits: 8 #16 #32
ANNOTATION_PREFIX
default:"instances"
required
Annotation file prefix. Default value is defined as ‘instances’.
SPLIT_NAMES
default:"['train', 'val']"
required
Specifies the names of the training and validation splits in the dataset.
Limits the maximum number of files to be loaded from the training and validation splits.
For example, [750, 250] value loads 750 training and 250 validation examples.
Dataset Path (You can enter a path from a website or your file system.)
MODEL_NAME
default:"fpn_aspp_regnetx800mf_edgeailite"
required
You are expected to enter the base model you will use for image segmentation.
Currently supported models: fpn_aspp_regnetx800mf_edgeailite, unet_aspp_mobilenetv2_tv_edgeailite, deeplabv3plus_mobilenetv2_tv_edgeailite
Number of epochs to be used in training
Batch size to be used in training
Number of GPUs to be used
4.1. REGNETx800MF
This model is used to separate objects in the image in detail. It recognizes objects of different sizes well and provides high accuracy in more complex tasks. It is preferred more in industrial and embedded systems.
4.2. UNET-MOBILENET
A lightweight and fast segmentation model. Suitable for mobile devices and small computers with low resource usage. Clearly extracts the boundaries of objects in the image.
4.3. DEEPLABV3plus-MOBILENET
Provides lightweight but detailed results. Accurately predicts the area and boundaries of objects in the image. Suitable for applications requiring medium accuracy and speed on edge devices.